

How To Install Tensorflow In Pycharm Windows 7
Step-By-Step guide to Setup GPU with TensorFlow on windows laptop.
![]()
gpu, tensorflow, Nvidia GeForce GTX 1650 with Max-Q, cuDNN 7.6, cuda 10.1, windows 10, tensorflow 2.3.
Part 1: Checking GPU card on your laptop?
The very first and important step is to check which GPU card your laptop is using, based on the GPU card you need to select the correct version of CUDA, cuDNN, MSVC, Tensorflow etc. To check the GPU card on your windows 10 laptop follow below simple steps:
- Right Click on your Desktop
- Open Nvidia Control Panel
- Goto Help -> System Information
Here you can check full name of your graphic card.
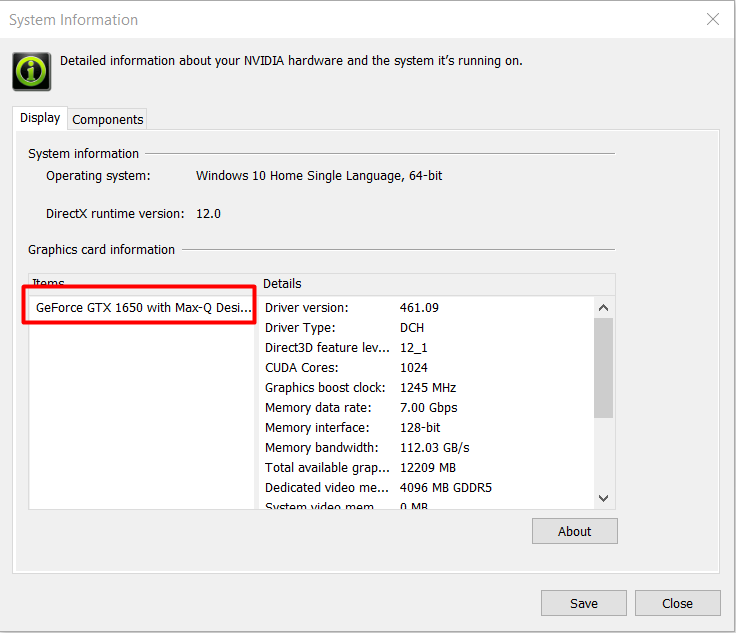
Once you know the name of the graphic card used by your machine go to Nvidia site here and check the compute compatibility (cuDNN) for your graphic card. If you could not find your graphic card on Nvidia site you can refer to this wiki page.
Note In my case Geforce GTX 1650 is not listed on Nvidia site so I checked it on the wiki page.
As per wiki page compute compatibility for Geforce GTX 1650 is 7.5 but there is no TensorFlow version that supports cuDNN 7.5 therefore, I upgraded my graphic driver and used cuDNN 7.6 that worked perfectly with TensorFlow 2.3.0.
Part 2: Installing correct version of Microsoft Visual C++ (MSVC), CUDA, cuDNN
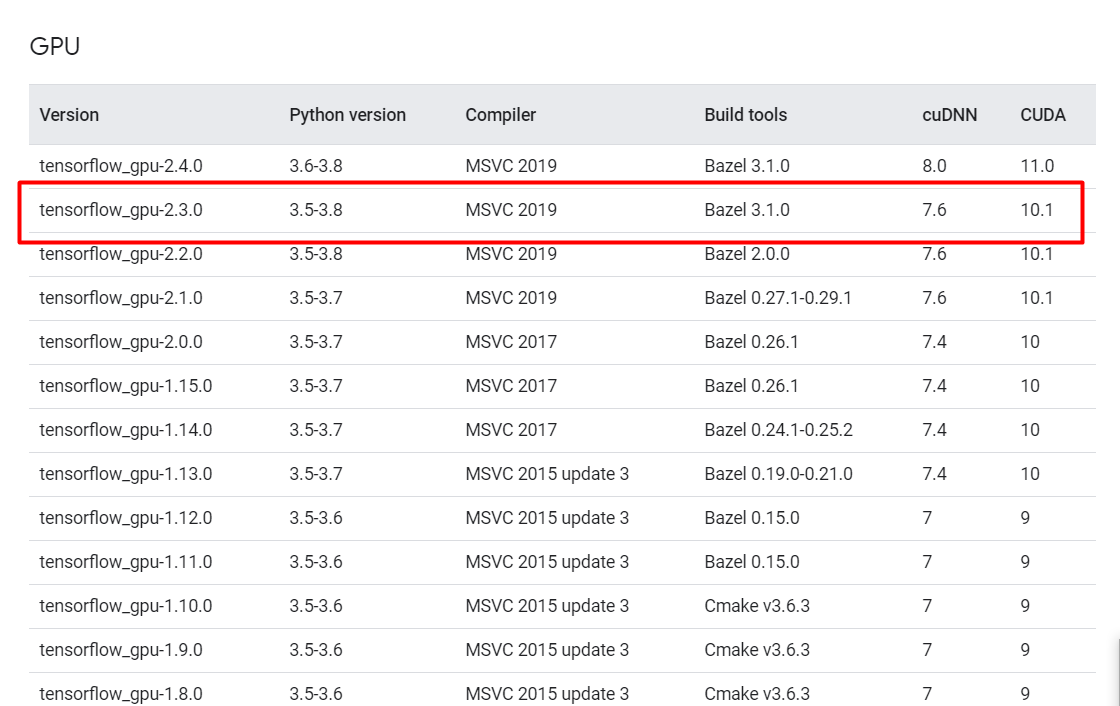
Based on cuDNN version supported by your graphic card check for compatible versions of MSVC, CUDA and Tensorflow here.
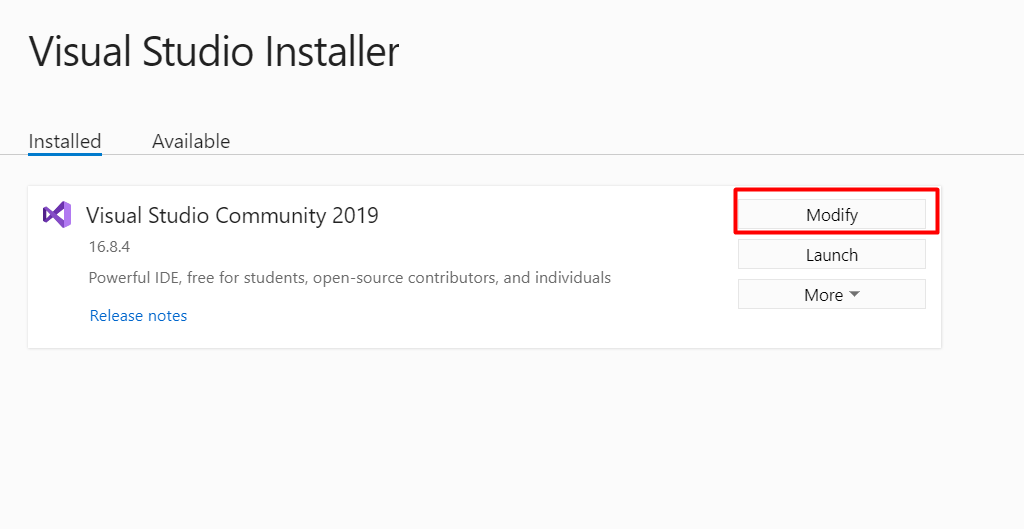
- Installing MSVC: Now download MSVC community 2019 from here and install it on your windows laptop. After installing Visual studio installer open it and under Installer tab Modify Visual Studio Community 2019.
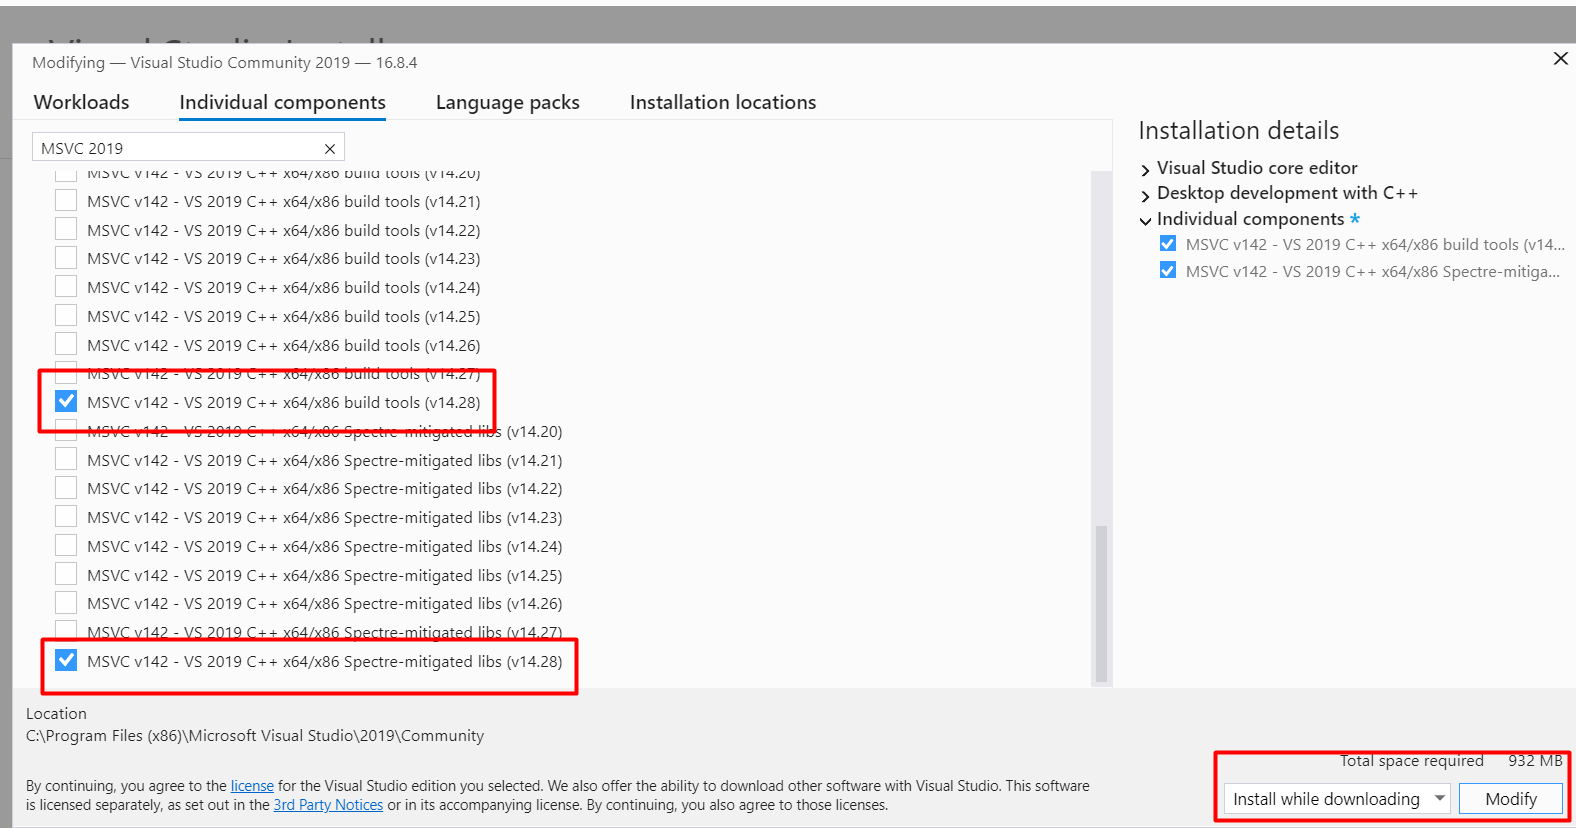
When you modify your visual studio, another window will open under it select individual components => search for MSVC 2019 => install components selected in below image.
- CUDA Installation: Next step is to install Cuda version, download Cuda version that is compatible with your cuDNN, Tensorflow and graphic card. In my case GeForce GTX 1650 is supported by cuDNN 7.6, Cuda 10.1 and Tensorflow 2.3.0. You can download the supported Cuda version from here.
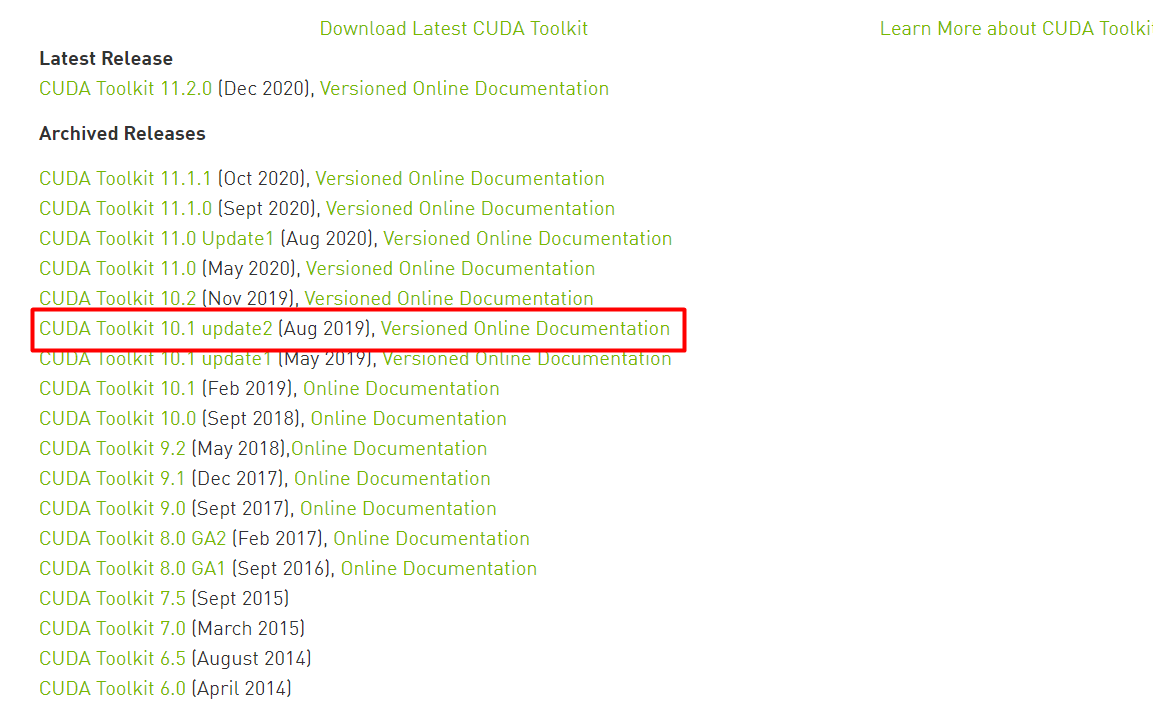
There are two types of Cuda installer available on Nvidia site which are network and local. I downloaded the local version in order to avoid installation failure in case of network issues.
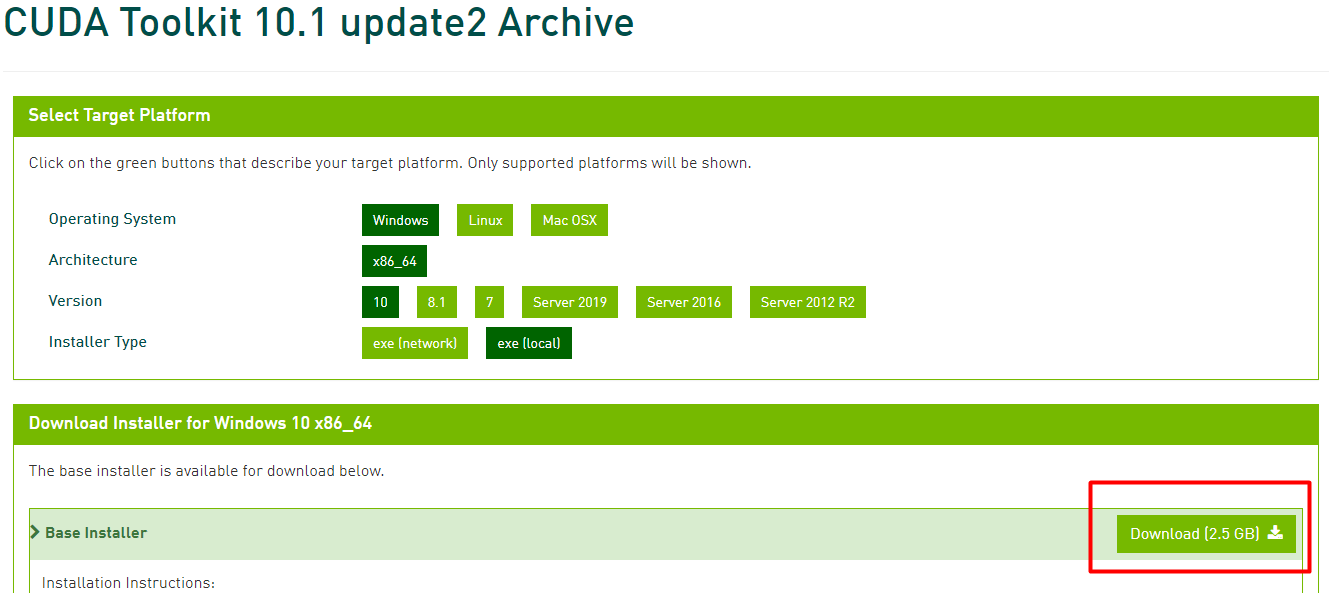
Once you download Cuda installer, follow onscreen installation guide and install it. Instructions are straightforward, but if you face any issues refer to the complete installation guide here.
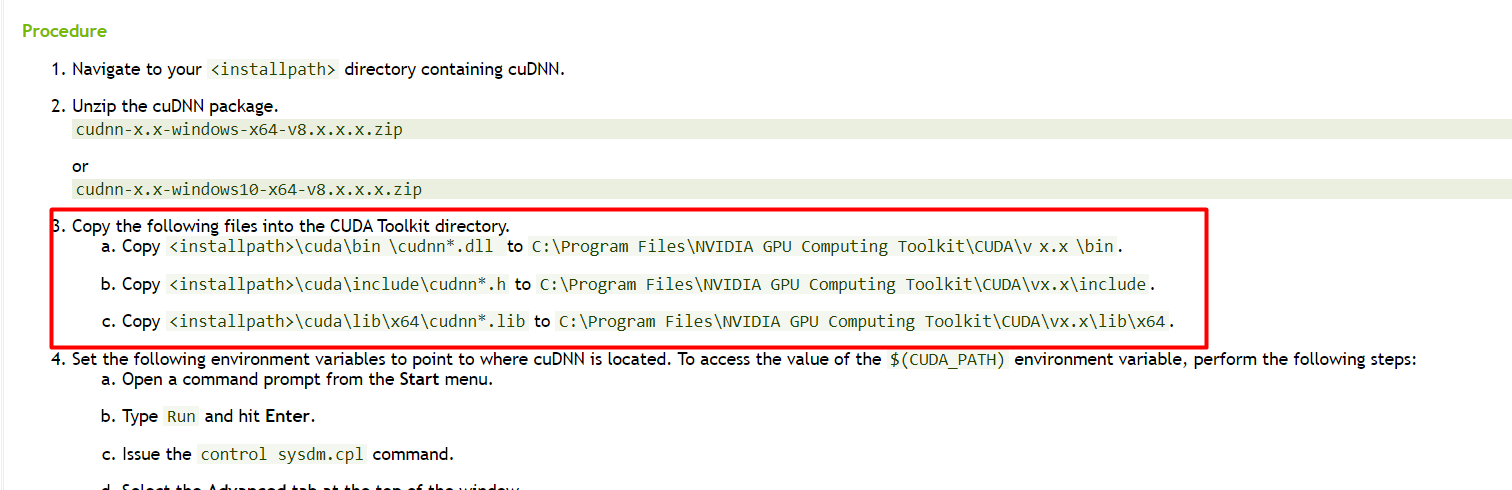
- cuDNN installation: This is the most important step if you install an incorrect version of cuDNN you will get an error while running your code with GPU. For GeForce GTX 1650 => Cuda 10.1 , Tensorflow 2.3.0, and cuDNN 7.6 (compute compatibility) are compatible. Download cuDNN from here. (Please note you need to login to Nvidia site to download cuDNN). This is a zip file and you need to copy files to the Cuda installation directory. Please refer to cuDNN document for more details.
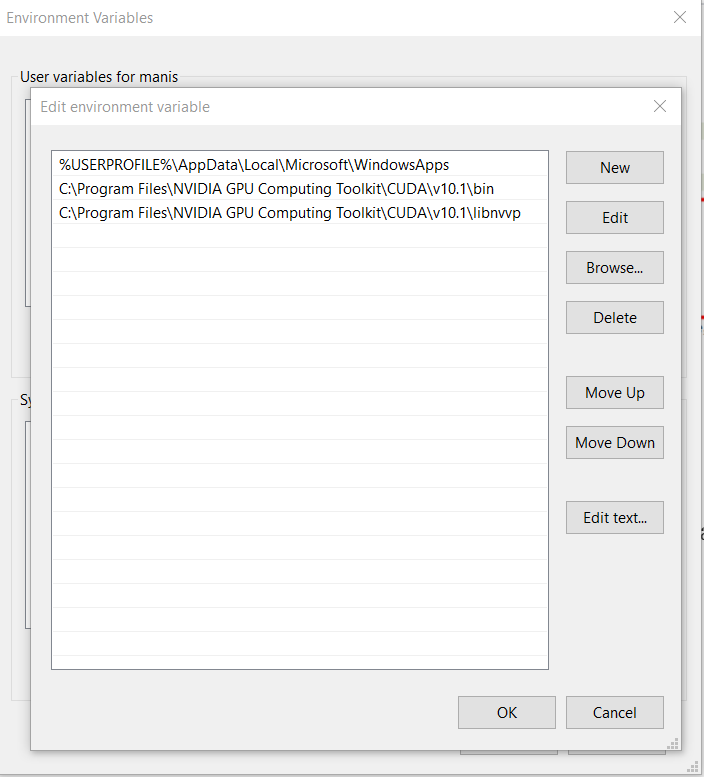
The last step is to set the environment variable path for Cuda. Add below to path variable (change Cuda version as per your requirement).
C:\Program Files\NVIDIA GPU Computing Toolkit\CUDA\v10.1\bin C:\Program Files\NVIDIA GPU Computing Toolkit\CUDA\v10.1\libnvvp
Part 3: Anaconda , Python and PycharmSetup
- Anaconda Installation : Download and install anaconda individual version supported by your machine from here. I have installed the latest version of anaconda 64-Bit Graphical Installer (457 MB).
- Python Installation: You can install python version between 3.5–3.8 as per requirement by Tensoflow and Cuda versions. I installed python 3.8.7 from here.
- Pycharm Installation: Download and install latest pycharm community version from here. You can either use Jupyter Notebook or Pycharm to run your code. I will use the anaconda prompt to create a virtual environment. Moreover, I will explain how to run code on GPU using both Jupyter Notebook and Pycharm in a virtual environment that we will be creating.
Part 4 : Creating Vitual environment, setting up tensorflow
At this point, you have all the required configurations to run your code on GPU. In this step, we will create and set up a virtual environment, that we will use while running our code.
- Creating and activating virtual environment: Open anaconda prompt and run below command to create a virtual environment.
conda create -n gpuEnv python=3.8 Once gpuEnv is created successfully use below command to activate it.
conda activate gpuEnv - Setting up TensorFlow: Now that a virtual environment is ready, lets setup TensorFlow 2.3.0 (please note that this is the TensorFlow version supported by my Cuda and cuDNN version)
pip3 install --upgrade tensorflow==2.3.0 ##after activating env run this code in activated env
Part 5: Running Code on GPU
Now that we have successfully created a virtual environment lets run our code using Pycharm or Jupyter Notebook. I will be using below code for digit recognition, implemented using TensorFlow.
              import numpy as np
import tensorflow as tf# load MNIST Digit data
data = tf.keras.datasets.mnist                # here data is split into 70,30 by default
(X_train, Y_train), (X_test, Y_test) = data.load_data()                # normalizing data
X_train = tf.keras.utils.normalize(X_train)
X_test = tf.keras.utils.normalize(X_test)                # checking shape of data
print(X_train.shape)
print(X_test.shape)                # function to create and compile model
def createModel(input_shape, num_classes, optimizer, loss, metrics):                                  model = tf.keras.models.Sequential()  ##a feed forward model , created stack of layer on top of it
                  model.add(tf.keras.layers.Input(shape=input_shape))
                  model.add(tf.keras.layers.Flatten())
                  model.add(tf.keras.layers.Dense(64, activation='relu'))
                  model.add(tf.keras.layers.Dense(128, activation='relu'))
                  model.add(tf.keras.layers.Dense(128, activation='relu'))
                  model.add(tf.keras.layers.Dense(num_classes, activation='softmax'))                                  model.compile(optimizer=optimizer, loss=loss, metrics=[metrics])                                  return model                # model
model = createModel(input_shape=(28, 28), num_classes=10, optimizer='adam',
                  loss='sparse_categorical_crossentropy',
                  metrics='accuracy')                model.summary()                print("Num GPUs Available: ", len(tf.config.experimental.list_physical_devices('GPU'))) #print no of GPU device                model.fit(X_train, Y_train, epochs=30, validation_split=0.1)
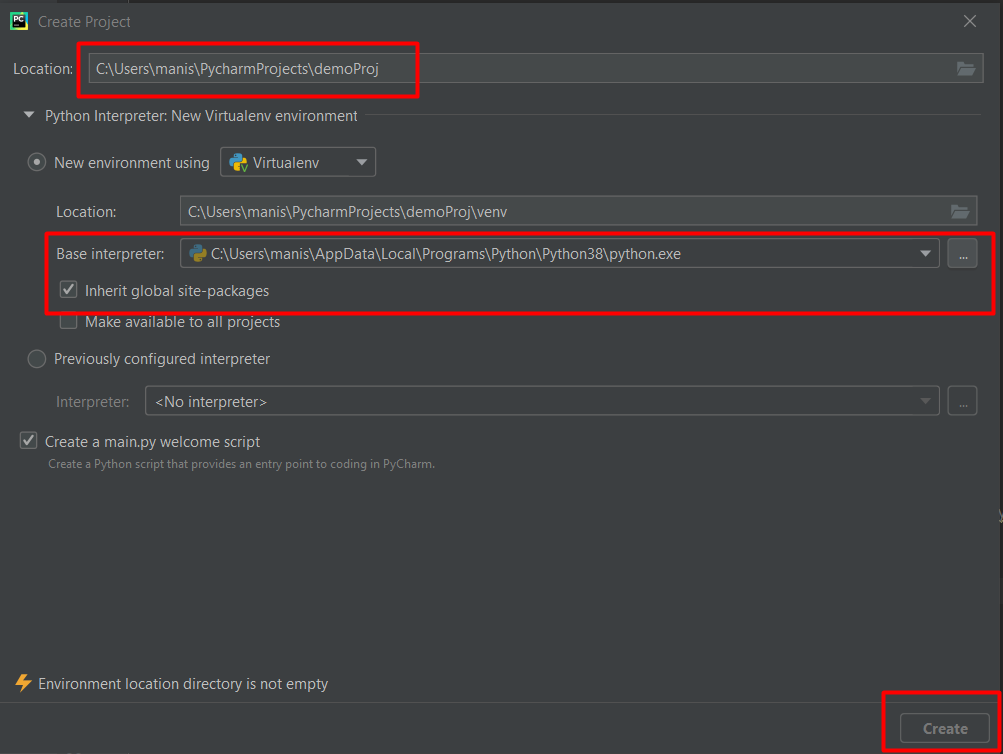
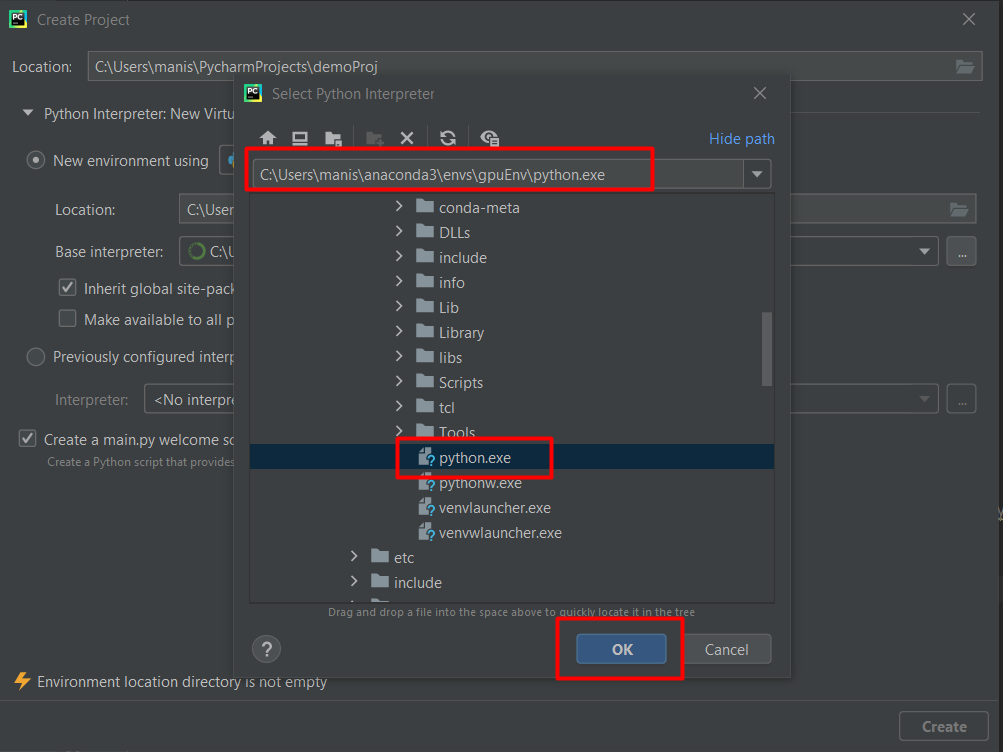
- Running code using Pycharm: Open pycharm and new create a project. While creating project select base interpreter as a virtual environment that you have created earlier.
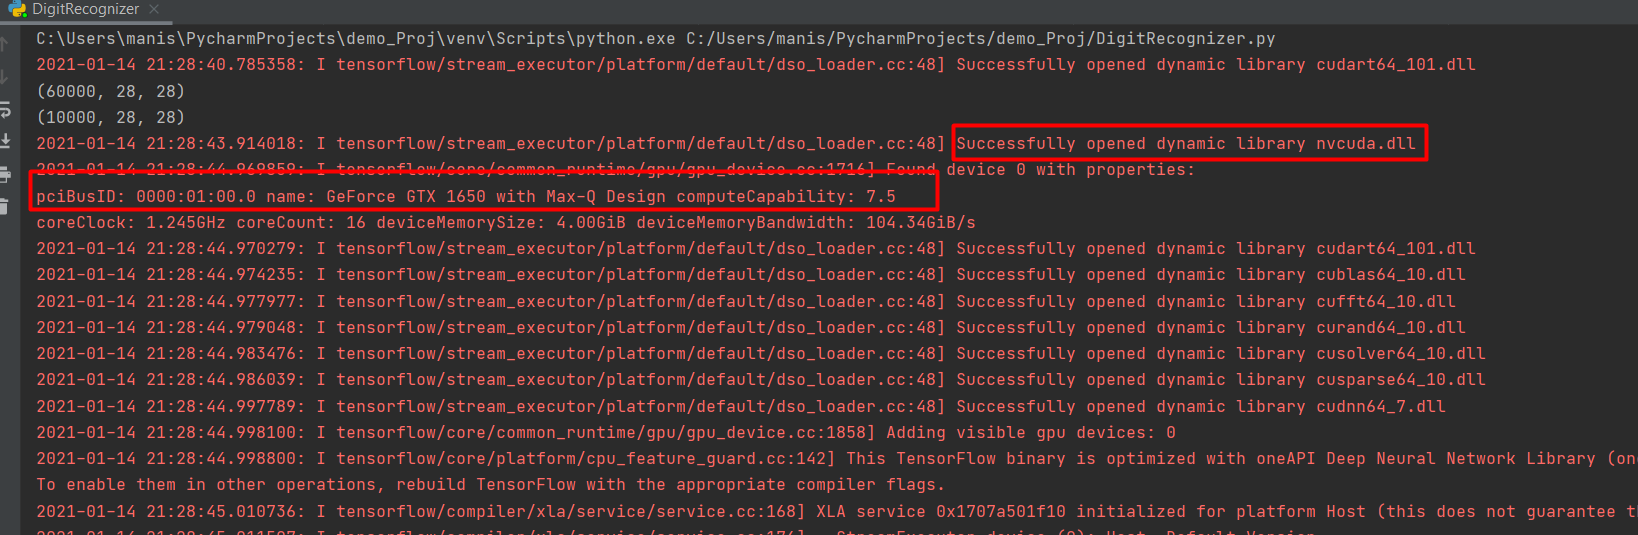
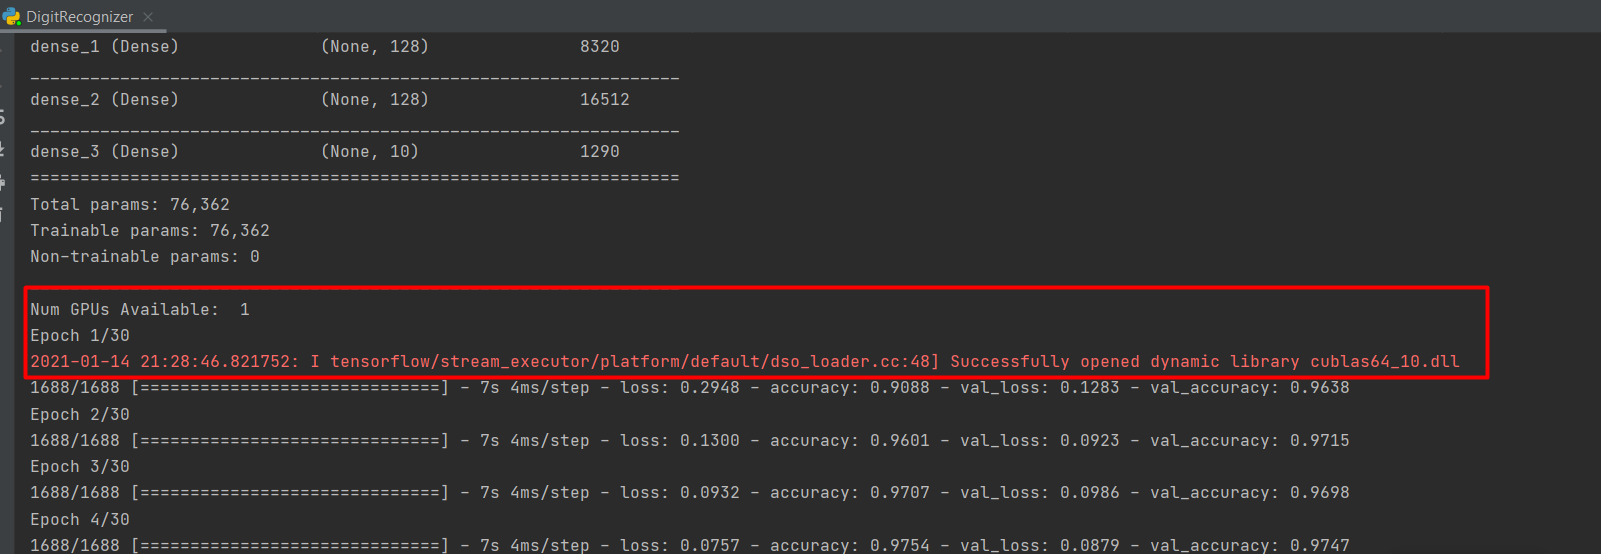
Now that your project is ready create a .py (python) file, copy above code and run it. To verify code ran successfully on GPU machine check below few points in pycharm console.
- Running code using Jupyter Notebook: To run the code on a created virtual environment, you need to add it manually to Jupyter notebook. You need to install ipykernel so that you can add a virtual environment to Jupyter notebook. Follow below steps to create and add a virtual environment to Jupyter notebook.
1 . Create a virtual environment using anaconda prompt, activate it, and install TensorFlow 2.3.0
conda create -n virEnv python=3.8 conda activate virEnv pip3 install --upgrade tensorflow==2.3.0
2. Install ipykernel using below command. (In the same anaconda prompt)
pip install --user ipykernel 3. Next, add the virtual environment in Jupyter Notebook using below command.
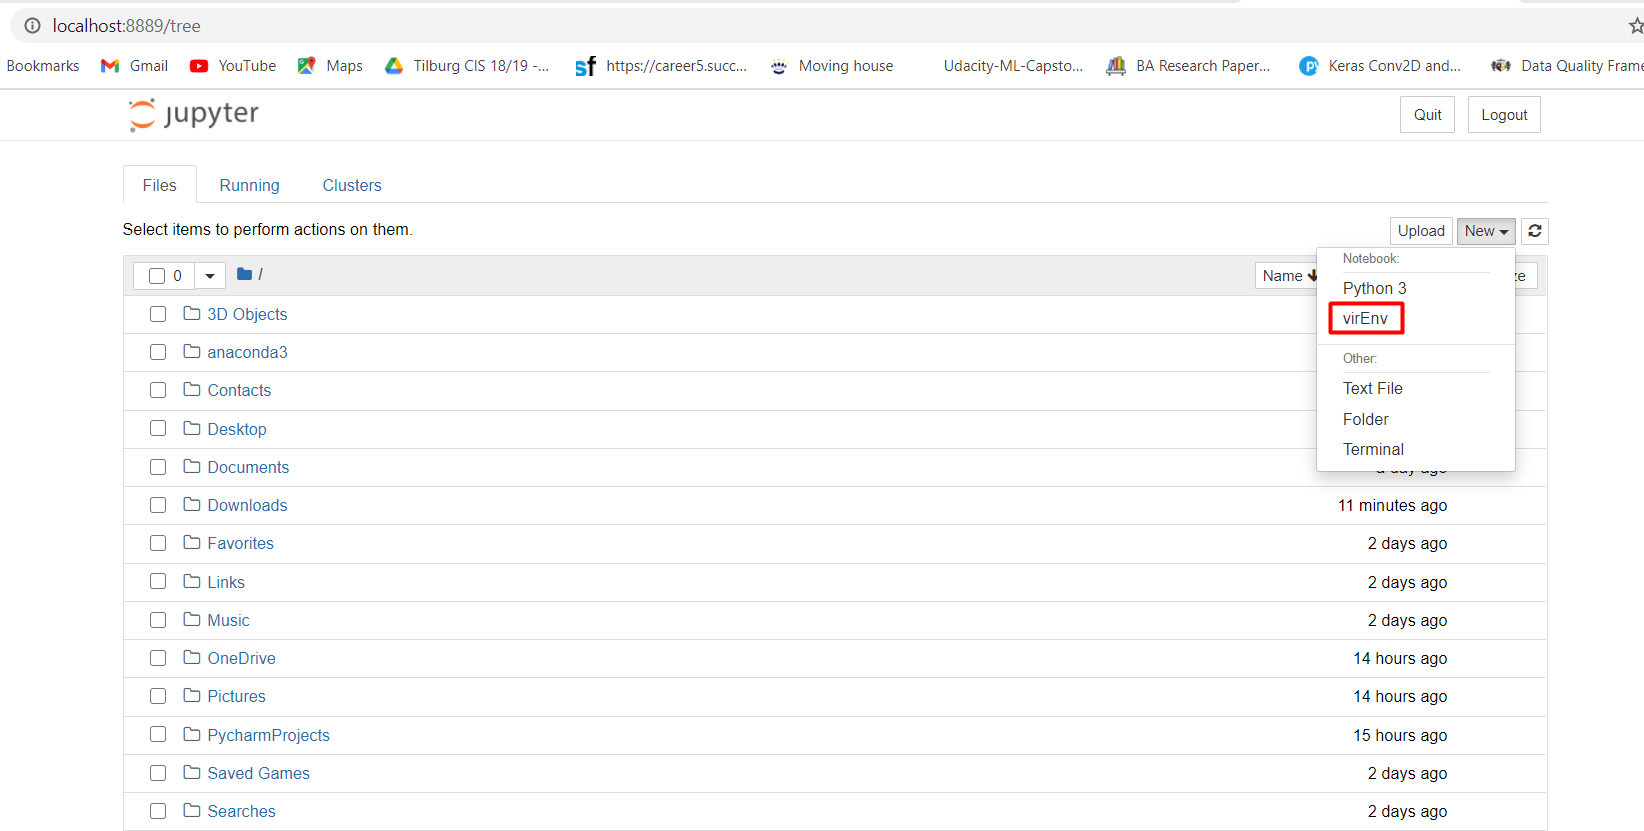
python -m ipykernel install --user --name=virEnv 4. Now open Jupyter Notebook, under Files => New => select your the virtual environment.
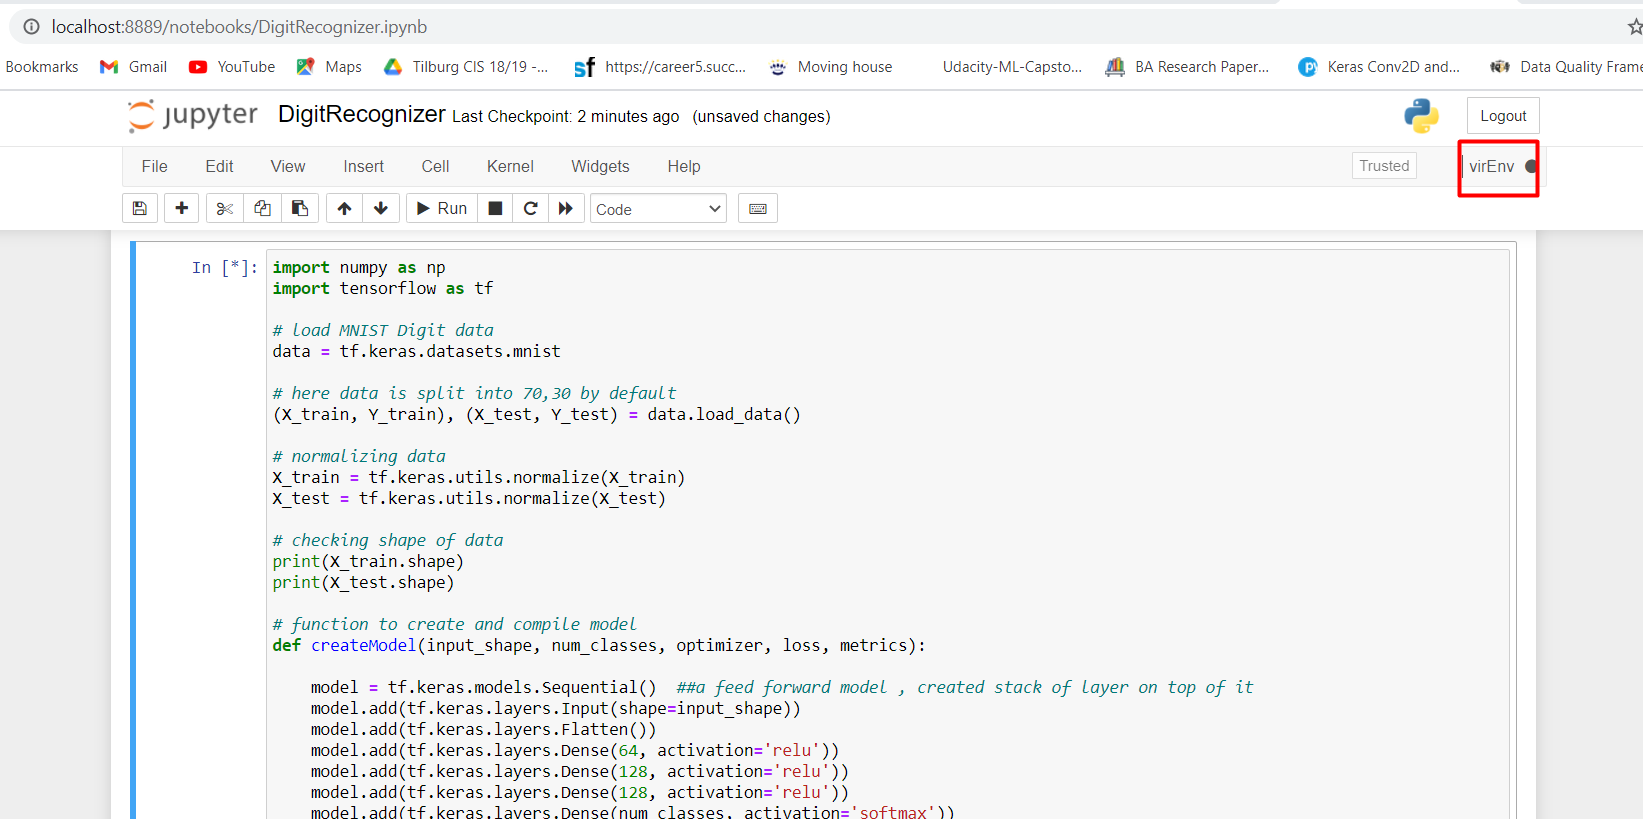
5. Now you can copy the above code and run it. You can notice the virtual environment on the right-hand side of your notebook.
Conclusion:
On an average, it took around 3 to 7 sec to run each training step using GPU however, when I ran the same code using CPU it took around 20 to 23 sec for each training step. I tried several combination of Cuda (10, 10.1, 11), cuDNN (7.5, 7.6, 8.0) and TensorFlow (1.15, 2.3.0, 2.4.0). Out of these combinations, below two combinations worked for my GeForce GTX 1650 graphic card.

Please note that updating my graphic card driver helped me to support cuDNN version 7.6. If you could not find the TensorFlow version that supports your GPUs compute compatibility (cuDNN 7.6), then this trick might help you to support the higher version of cuDNN on your graphic card.
Thank you for reading…
How To Install Tensorflow In Pycharm Windows 7
Source: https://medium.com/analytics-vidhya/step-by-step-guide-to-setup-gpu-with-tensorflow-on-windows-laptop-c84634f59857
Posted by: parkernineirackly96.blogspot.com
0 Response to "How To Install Tensorflow In Pycharm Windows 7"
Post a Comment